

One of my toilets is inconsistent in its ability to function as such despite repeated attempts to fix it. When I told my husband, in a mostly joking manner, that we should get a composting toilet to replace it, I’m sure he envisioned something old fashioned like a bucket with sawdust that was carried out into the backyard compost bin. To be honest, I did not really have a good idea myself of what a composting toilet was or how it functioned.
Application and Benefits
As it turns out there are plenty of options out there for a composting toilet, which looks exactly like a real toilet. When searching big box stores like Home Depot, it appears the composting toilet is marketed to either tiny home owners or campers. These could also be used in places where running plumbing lines would be cost prohibitive but the convenience of a toilet would be nice such as a back workshop or garage. Another common application is at state and national parks. Both Mount Rainier National Park and Smith Rocks State Park have installed variations of composting toilets.
“If your mobile home or tiny house lacks the plumbing to support a traditional flushing commode, a composting toilet could be the solution.”
— Bob Villa
Besides its easy installation, another benefit is the waterless feature, saving a limited supply of water, especially helpful while camping at a spot without direct water hook-ups. It is easy to forgot when at home that each flush uses several gallons of water. That amount pales in comparison to the amount of water required to treat and sanitize the waste at the wastewater treatment plant. The EPA estimates 34 billion gallons of wastewater are processed daily in the United States.
How it Works
A common misconception about composting in general is the smell, so naturally many would think a composting toilet has the same issue. But the design and function of composting toilets actually makes them odorless. The way it works is by separating the liquids from the solids and then using some sort of additive such as peat moss, to break down the solids. Some toilets can last 4-6 weeks with two people using them before the waste needs to be removed. You have two options for disposal, emptying the contents into a bag and tossing it in the trash or using the compost in your garden. There is debate as to whether the conditions in a composting toilet are hot enough to break down everything that could be a health risk, so using it in your yard may not be a good solution. A third option is to let nature take care of it for you. Worms have been shown to break down the waste by 76% in about a months time, drastically higher than the 17% break down without their assistance.
There are two types of composting toilets—self-contained and split/central systems. The self contained toilet has a detachable tank and liquid drain to remove waste. The whole process occurs in the toilet. In a split or central system, they connect to a system of pipes that moves the waste to a tank to break down the waste. These systems are not portable like many self-contained systems. Some models need electricity to power a fan that draws air across the tank, aiding the bacteria in the process of breaking down the waste and ventilating the carbon dioxide created.
Scaling the Composting Toilet Up
Composting toilets are great solutions when permanent hook-ups are not available. When camping, you accept a lower level of refinement because you are in the great outdoors, so a composting toilet would not be all that out of place. But despite their positive impact on our water consumption and waste production, the idea of composting toilets as part of everyday life is unlikely. Even though when properly managed they have little odor, they still have to be maintained. No one wants to add raking or sifting or even emptying their toilet to their routine. With a simple flush the problem goes away. So instead of pushing the idea of composting toilets, other alternatives like low flow or waterless toilets that cut down on water usage should be explored.
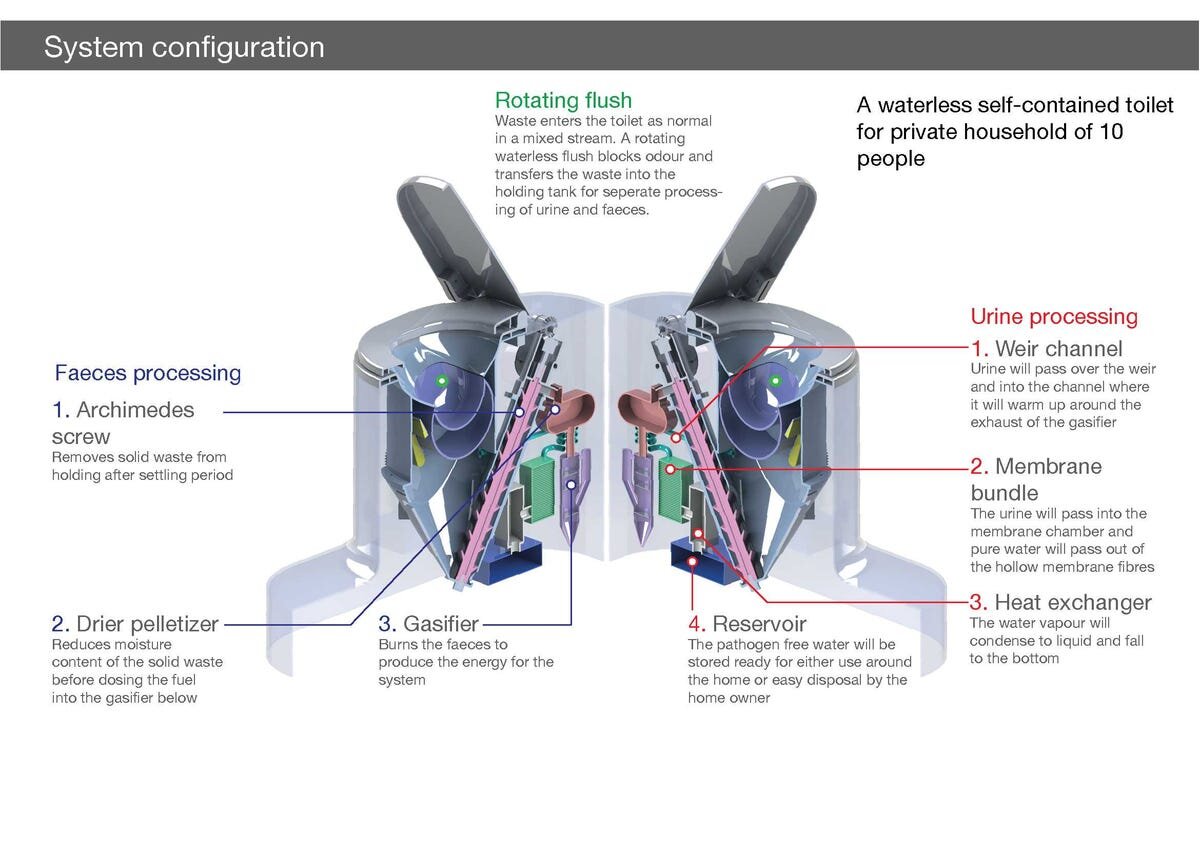
One such waterless toilet has received funding from the Bill and Melinda Gates Foundation to serve poor urban areas which do not have good infrastructure and lack access to stable, clean water supplies. The battery operated toilets have quite a complex system of operations once you “flush” the waste that results in actually creating usable water for water plants, cleaning, cooking and bathing. The solid waste that is dried out in a separate chamber is then used at a thermo-processing plant to produce energy. Like the composting toilet, this one also requires someone to empty the bin and remove the waste.
No one likes to spend time thinking about their waste. But it appears this subject has some real potential to advance with the help of technology. While the composting toilet may not be the permanent solution, the opportunity exists to create an entirely new system of waste management from what exists today. The time, energy, and water spent treating our waste only to dump it into a larger body of water could be replaced with some minimal at home maintenance. Or a whole new labor market could be created with companies maintaining the waterless toilet of the future. Who knows what another 20 years of funding and research may produce.

Leave a comment